SMALL
공식 문서 : https://www.thymeleaf.org/doc/tutorials/3.1/usingthymeleaf.html#introducing-thymeleaf
thymeleaf 란?
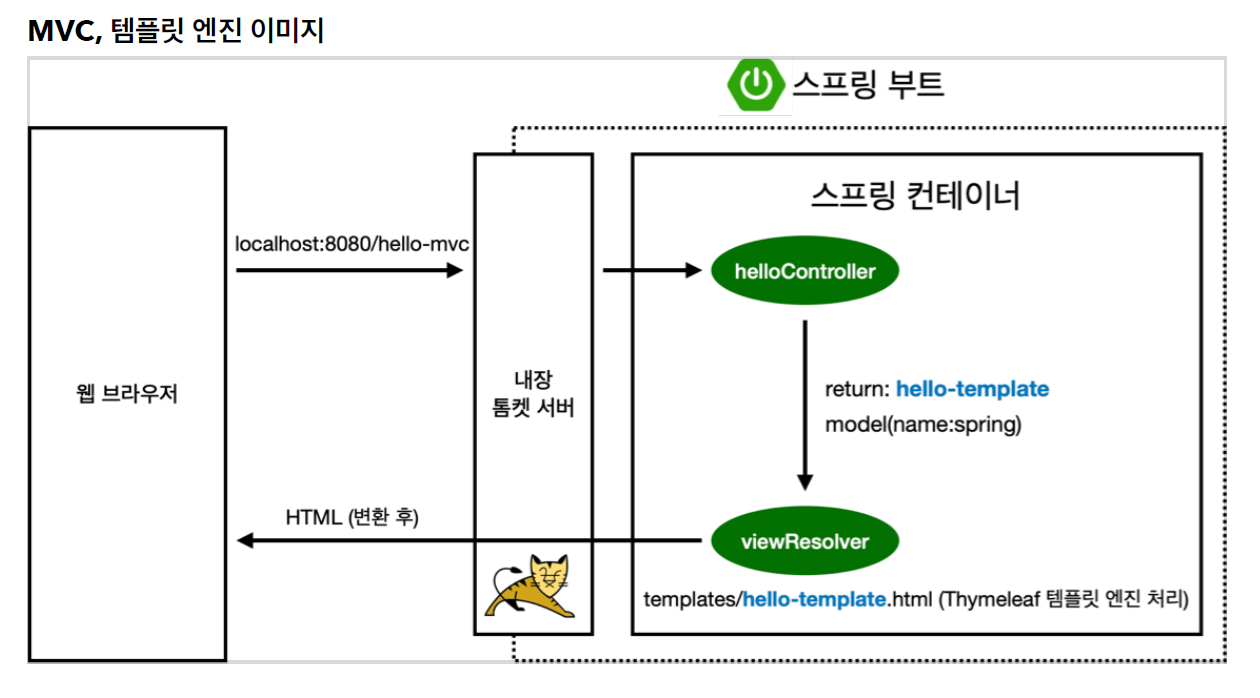
타임리프란? 뷰 플랫폼 이라고 말하기도 합니다. 뷰 템플릿은 컨트롤러가 전달하는 데이터를 이용하여 HTML 파일을 Client 에게 전달하기도 합니다. 해당 구조는 아래에 그림으로 표현하였습니다.

gradle thymeleaf
implementation 'org.springframework.boot:spring-boot-starter-thymeleaf'
thymeleaf 태그
| 태그 | 설명 |
| th:text | 요소의 텍스트 내용을 지정합니다. |
| th:if | 조건문을 지정하고, 조건이 참일 때 해당 요소를 표시합니다. |
| th:each | 반복문을 지정하고, 컬렉션의 각 항목에 대해 요소를 생성합니다. |
| th:href | 요소의 링크 URL을 지정합니다. |
| th:src | 요소의 소스 URL을 지정합니다. |
| th:attr | 요소의 속성 값을 지정합니다. |
| th:style | 요소의 스타일을 지정합니다. |
| th:class | 요소의 CSS 클래스를 지정합니다. |
| th:disabled | 요소를 비활성화합니다. |
| th:checked | 체크박스 또는 라디오 버튼을 선택 상태로 설정합니다. |
| th:selected | 셀렉트 박스의 옵션을 선택 상태로 설정합니다. |
| th:switch | 다중 분기 조건문을 지정하고, 해당하는 경우의 블록을 실행합니다. |
| th:case | th:switch 문 내에서 다중 분기 조건을 지정합니다. |
| th:unless | 조건문의 반대인 경우에 해당 요소를 표시합니다. |
| th:inline | 템플릿에서 자바 코드를 인라인으로 실행합니다. |
| th:remove | 요소를 제거합니다. |
| th:block | 레이아웃의 블록을 정의합니다. |
| th:fragment | 레이아웃의 조각을 정의하고 재사용합니다. |
| th:replace | 요소를 다른 요소로 대체합니다. |
| th:object | 폼 요소의 바인딩 객체를 지정합니다. |
| th:field | 폼 요소의 필드를 지정합니다. |
| th:errors | 폼 필드의 오류 메시지를 표시합니다. |
| th:action | 폼 요소의 액션 URL을 지정합니다. |
| th:method | 폼 요소의 전송 방식을 지정합니다. |
| th:with | 변수를 정의하고 템플릿에서 사용합니다. |
thymeleaf 표현식
| 표현식 | 설명 |
| ${expression} | 변수나 속성을 참조합니다. |
| *{expression} | 폼 요소와 관련된 변수나 속성을 참조합니다. |
| @{URL} | URL을 생성합니다. |
| @{/URL} | 컨텍스트 상대적인 URL을 생성합니다. |
| @{{URL}} | 정적 URL을 생성합니다. |
| ${#strings.isEmpty(str)} | 주어진 문자열이 비어 있는지 확인합니다. |
| ${#numbers.formatDecimal(num, minFractionDigits, maxFractionDigits)} | 주어진 숫자를 형식화합니다. |
| ${#dates.format(date, pattern)} | 주어진 날짜를 형식화합니다. |
| ${#calendars.createNow()} | 현재 시간을 나타내는 Calendar 객체를 생성합니다. |
| ${#aggregates.sum(list, 'property')} | 주어진 속성의 값들의 합계를 계산합니다. |
| ${#lists.size(list)} | 주어진 리스트의 크기를 반환합니다. |
| ${#arrays.length(array)} | 주어진 배열의 길이를 반환합니다. |
| ${#sets.size(set)} | 주어진 세트의 크기를 반환합니다. |
| ${#maps.size(map)} | 주어진 맵의 크기를 반환합니다. |
| @{messages.key} | 다국어 지원을 위해 메시지 키를 참조합니다. |
| ${#locale.language()} | 현재 로케일의 언어를 반환합니다. |
| ${#locale.country()} | 현재 로케일의 국가를 반환합니다. |
| ${#httpServletRequest.requestURL} | 현재 요청의 URL을 참조합니다. |
| ${#httpSession.getAttribute('attributeName')} | HttpSession에서 지정된 속성 이름에 해당하는 속성 값을 참조합니다. |
thymeleaf xml 파일로 관리 할수 있다.
HTML 파일이 아닌 xml 를 따로 만들어서 관리 할수 있다. 이 방법을 통해 HTML 만드는 프론트엔드 개발자가 만들어 놓으면 백엔드 개발자가 xml 파일을 만들어 데이터를 관리할수 있어서 좋은것 같다.
단, 아래의 Configuration 을 추가하여야 한다.
아래의 코드는 Uno 님의 코드를 참고하였다.
@Configuration
public class ThymeleafConfig {

    @Bean
    public SpringResourceTemplateResolver thymeleafTemplateResolver(
            SpringResourceTemplateResolver defaultTemplateResolver,
            Thymeleaf3Properties thymeleaf3Properties
    ) {
        defaultTemplateResolver.setUseDecoupledLogic(thymeleaf3Properties.isDecoupledLogic());

        return defaultTemplateResolver;
    }


    @RequiredArgsConstructor
    @Getter
    @ConstructorBinding
    @ConfigurationProperties("spring.thymeleaf3")
    public static class Thymeleaf3Properties {
        private final boolean decoupledLogic;
    }

}
thymeleaf xml 파일 정리.
index.html 파일과 index.th.xml 파일을 나눠서 관리 한다.
<!DOCTYPE html>
<html lang="ko">
<head>
    <meta charset="UTF-8">
    <meta name="viewport" content="width=device-width, initial-scale=1">
    <meta name="description" content="">
    <meta name="author" content="KwonJongWon">
    <link href="https://cdn.jsdelivr.net/npm/bootstrap@5.3.0-alpha3/dist/css/bootstrap.min.css" rel="stylesheet" integrity="sha384-KK94CHFLLe+nY2dmCWGMq91rCGa5gtU4mk92HdvYe+M/SXH301p5ILy+dN9+nJOZ" crossorigin="anonymous">
    <link rel="stylesheet" href="css/index.css">
    <title>게시판 페이지</title>

    <style>

    </style>

</head>

<body>

    <header id="header">
        헤더 삽입부
        <hr>
    </header>
			<table class="table widget-26" id="article-table">
                    <tbody>
                    <tr>
                        <td>
                            <div class="widget-26-job-emp-img">
                                <img src="https://bootdey.com/img/Content/avatar/avatar5.png" alt="Company" />
                            </div>
                        </td>
                        <td>
                            <div class="widget-26-job-title">
                                <a id="title">게시글 입돠</a>
                                <p class="m-0"><span id="created-at" class="text-muted time"><time>2023-01-01</time></span></p>
                            </div>
                        </td>
                        <td>
                            <div class="widget-26-job-info">
                                <p class="type m-0" id="user-id">작성자</p>
                            </div>
                        </td>
                        <td>
                            <div class="widget-26-job-category bg-soft-base">
                                <i class="indicator bg-base"></i>
                                <span id="hashtag">해시태그 입돠</span>
                            </div>
                        </td>
                    </tr>
                    </tbody>
                </table>
    <script src="https://cdn.jsdelivr.net/npm/bootstrap@5.3.0-alpha3/dist/js/bootstrap.bundle.min.js" integrity="sha384-ENjdO4Dr2bkBIFxQpeoTz1HIcje39Wm4jDKdf19U8gI4ddQ3GYNS7NTKfAdVQSZe" crossorigin="anonymous"></script>

</body>

</html><?xml version="1.0"?>
<thlogic>
<attr sel="#article-table">
<attr sel="tbody" th:remove="all-but-first">
<attr sel="tr[0]" th:each="article : ${articles}">
<attr sel="#title" th:text="${article.title}" th:href="@{'/articles/'+ ${article.id}}" />
<attr sel="#hashtag" th:text="${article.hashtag}" />
<attr sel="#user-id" th:text="${article.nickname}" />
<attr sel="#created-at/time" th:datetime="${article.createdAt}" th:text="${#temporals.format(article.createdAt, 'yyyy-MM-dd')}"/>
</attr>
</attr>
</attr>
</thlogic>
위의 코드를 설명하자면 Controller 에서 articles 라는 리스트를 준다. 그걸 th:each 를 통해 반복문을 주고 id 값의 태그들의 th:text 즉 text 를 바꾸게 된다. 이러한 방식으로 id 나 class 나 태그를 직접 가져오고 바꿀수 있다.
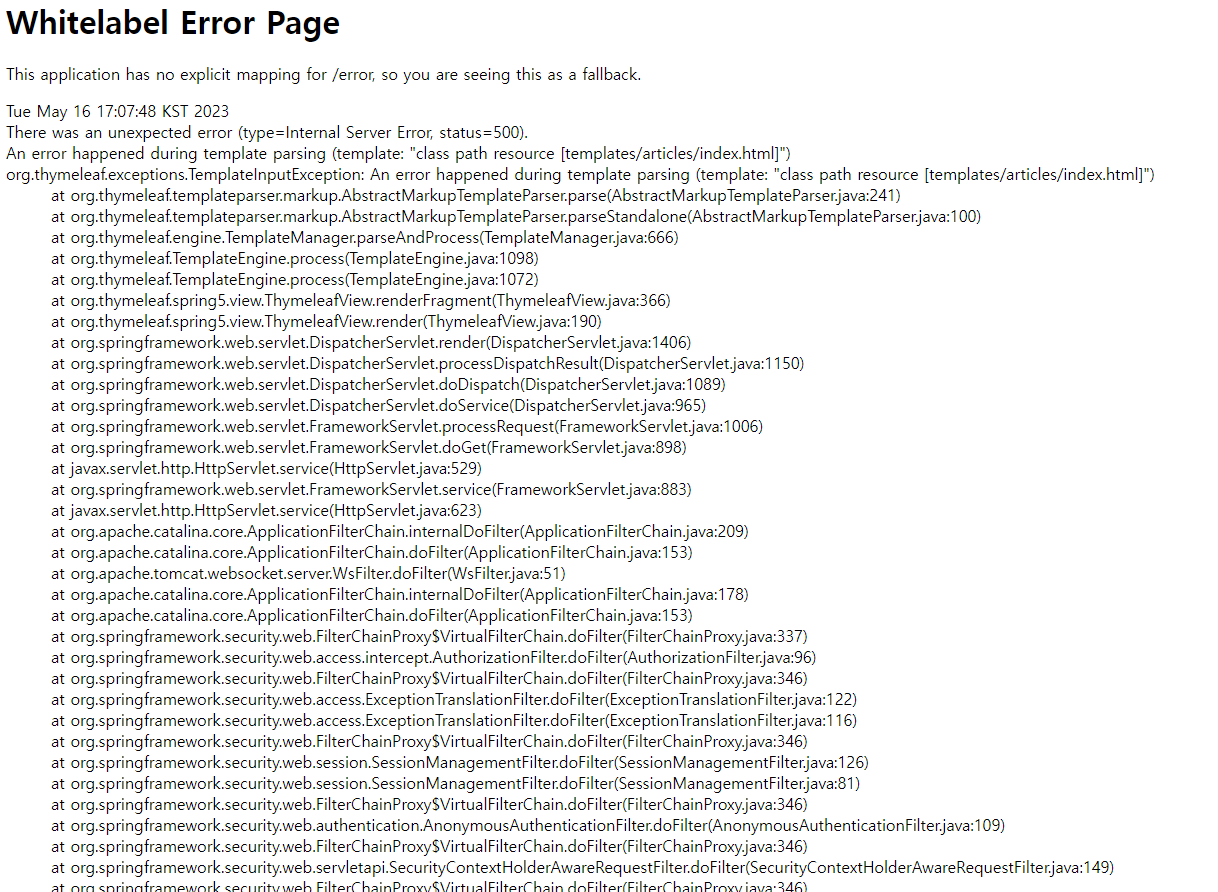
만약 xml 에서 오류가 발생하게 된다면
이러한 오류가 나올테니 이때는 xml 파일이 오류 이므로 찾아보기를 희망한다.
org.thymeleaf.exceptions.TemplateInputException: Error while processing decoupled logic file: <attr> injection tag does not contain any "sel" selector attributes. (template: "articles/index" - line 11, col 69)
개인적으로 소감
아무래도 나는 xml 파일 형태보다는 직접 html 파일에서 작업하는 편이 좀더 편리하다고 느꼈다.
xml 관리하는대로 따로 개발이 가능하는 장점이 있겠지만, 계속 html 파일안에서 관리했던 나에게는 어색하고 불편하게 다가 왔다.
반응형
LIST
'Spring' 카테고리의 다른 글
| Spring Security (1) (0) | 2023.05.24 |
|---|---|
| Websocket (1) (0) | 2023.05.21 |
| Querydsl (2) | 2023.05.19 |
| Rest Repositories (0) | 2023.05.19 |
| DTO, Entity, Response 연관관계 (0) | 2023.05.16 |
